
Applies to
An environment where VidiCore API Service logs need to be stored at specified AWS S3 bucket location
Summary
This article describes how to set up VidiCore as-a-Service instance to log to an S3 bucket through the VidiNet Dashboard, including what permission a customer needs to set on their S3 bucket to allow the VidiCore instance to write its logs to the bucket. It also shows how to use LogStash to make use of the logs.
Prerequisites and system requirements needed for this article
-
an AWS account with the necessary control over the permissions needed for integration with VidiCore API / VidiNet.
-
a basic understanding of the AWS services such as S3 ( the cloud storage) and IAM ( the permissions service )
-
a verified installation of VidiCore API / VidiNet
-
a verified S3 bucket set up in your AWS account in order to attach this service to VidiNet
Logs including requests can only be obtain by running VidiCore 5.5.1, 5.4.3, 5.3.6 or later.
Setting up your AWS S3 bucket
To create an S3 bucket in AWS, direct your attention to the web page of your AWS account and the Service S3.
-
click the Create Bucket button and follow the instructions prompted by AWS.
-
to create the subdirectories, click on your bucket and then click the button Create folder. Choose a name for the initial storage.
Repeat this process for the thumbnails directory.
In order for the S3 Bucket to be accessible for VidiNet, a user needs to be created or modified, to be allowed to use this resource. To grant permissions for the user to the S3 storage resource an AWS IAM Policy is used.
First, create a new user that should have permission to access this S3 bucket. Navigate to the AWS IAM Service. Click Users and then click the button Add user. Follow the instruction prompted by the dialogue box. Make sure to enable Programmatic Access to this users Access type.
Configure logging in VidiNet Dashboard
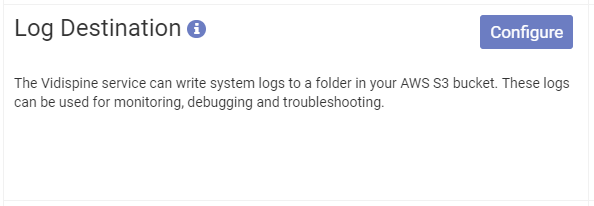
The logging is configured from the VidiNet Dashboard. Find the panel named "Log Destination" (see below).
Select configure and add you bucket name and a folder where you want the logs to be stored. VidiCore will create the folder if it does not exist. The logs will be stored in a folder hierarchy with the format yyyy/MM/dd/<logfiles>.
Select configure and add you bucket name and a folder where you want the logs to be stored. VidiCore will create the folder if it does not exist. The logs will be stored in a folder hierarchy with the format yyyy/MM/dd/<logfiles>.
VidiCore as a Service will be recycled when applying or removing log destination setting in VidiNet.
Logs will not be removed from S3 upon log destination setting removal in VidiNet.
This operations takes a couple of minutes, during that time your system will be in updating state. Search index will be kept intact and no further initialization is needed.
When you have created the log destination it will be visible in the panel, allowing you to edit it, or remove it at any time.
.png?cb=2e69f50513dfddd1ceddd87214cd299f)
Note: Make sure you use different buckets and/or folders for your different Vidispine API instances to avoid mixing up logs in the log folders.
Set S3 Policy
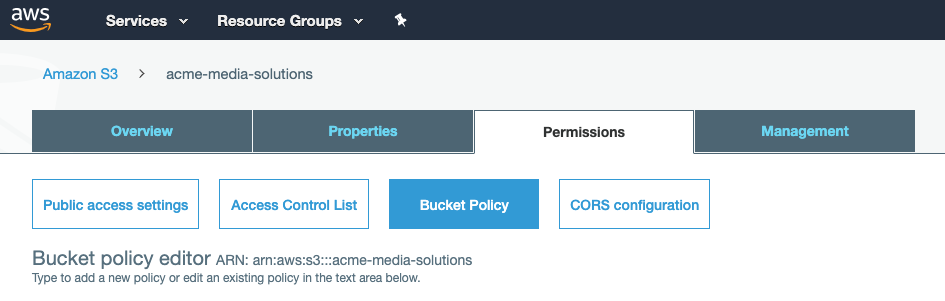
After log destination is applied in VidiNet dashboard open the AWS console and navigate to Amazon S3 and select the bucket you want to use. The policy is set under Permissions->Bucket Policy (see picture)
In the bucket policy editor, add the following policy for your bucket.
{
   "Version": "2012-10-17",
   "Statement": [
       {
           "Sid": "Statement3",
           "Effect": "Allow",
           "Principal": {
               "AWS": "arn:aws:iam::823635665685:role/{vaas-name}-vidispine"
           },
           "Action": "s3:PutObject",
           "Resource": "arn:aws:s3:::{your-s3-bucket}/*"
       }
   ]
}
vaas-name is the first part of your VidiCore API endpoint:
Example API endpoint example.myvidispine.com would use vaas-name = example
Logstash
Once this bucket is configured the logs will start coming into the bucket with the selected prefix. There will be a lot of small log files, which you can for example pick up and make use of with LogStash. The following config can be used to pick up all new files and save them to a local file: server.log, it will also delete processed files to keep your bucket clean. Note that you can use both temporary credentials with a session token or static credentials:
input {
  s3 {
    "access_key_id" => "AKIA..."
    "secret_access_key" => "keVM..."
    "bucket" => "acme-media-solutions"
    "backup_to_dir" => "/tmp/processed"
    "region" => "eu-west-1"
    "prefix" => "vs-logs/"
    "interval" => 5
    "delete" => true
    "additional_settings" => {
      "follow_redirects" => false
    }
  }
}

filter {
  grok {
    match => { "message" => "\[%{GREEDYDATA:instance}\] %{IP:client} - - \[%{GREEDYDATA:timestamp}\] %{GREEDYDATA:text}" }
  }
  mutate {
    strip => "message"
  }
}

output {
  stdout { }
  file {
    path => "server.log"
    codec => line { format => "%{message}"}
  }
}
Start LogStash and you can investigate your logs from there:
$ logstash -f config.json
for more advanced security configurations of S3 storage, please refer to AWS
Related articles
Working with IAM policys on AWS