
Plugins [MP OG]
MediaPortal plugins allows customers to develop their own code which will be dynamically loaded into pre-defined locations within MediaPortal’s code. This allows plugins to natively interact with the Javascript objects and functions in the same context giving more flexibility than alternatives such as inline frames.
This feature is achieved through JavaScript Module Federation, where MediaPortal acts as the “host”, and each plugin is a “remote”. There is a list of “shared modules” which the plugin can import from the host.
MediaPortal has a predefined list of “entry-points” where a plugin’s code will be loaded. Each plugin must include configuration to list which code it “exposes” to the MediaPortal. Each plugin can choose to use one or more entry-points, and MediaPortal can use multiple plugins at the same time. ConfigPortal is used to store information about where the plugins are located and which entry-points should be loaded.
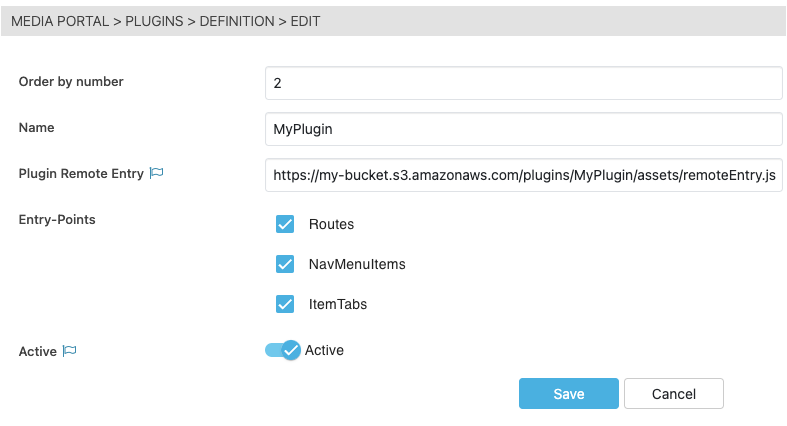
Configuration
Order by number: MediaPortal will load plugins in ascending order, allowing one plugin to potentially override another.
Name: Any errors or warnings will use this name in the logs.
Plugin Remote Entry: The URL to the “remoteEntry.js” file. All other assets (js, css, fonts) should be relative to this path.
Entry-Points: Enable which entry-points the plugin will be loaded into MediaPortal. Only enable the entry-point if the plugin has implemented it.
Active: Whether the plugin is loaded.
Plugin Development
This tutorial assumes that the reader is familiar with Javascript development, has Node (v20 LTS or later) installed, and is running MediaPortal (v24.1 or later).
Folder Structure
my-mediaportal-plugin/
├─ .vscode/
│  ├─ extensions.json
│  ├─ settings.json
│  ├─ tasks.json
├─ dist/
│  ├─ my-mediaportal-plugin
│  │  ├─ ...
│  │  ├─ remoteEntry.js
├─ node_modules/
├─ src/
│  ├─ ItemTabs.jsx
│  ├─ NavMenuItems.jsx
│  ├─ Routes.jsx
├─ index.html
├─ package.json
├─ vite.config.js
Initial Setup
Create the initial project:
mkdir my-mediaportal-plugin
cd my-mediaportal-plugin
npm init -y
Configure the package.json:
npm pkg delete main author description keywords license
npm pkg set type="module"
npm pkg set private=true --json
npm pkg set scripts.build="vite build --assetsDir $npm_package_name"
npm pkg set scripts.watch="vite build --assetsDir $npm_package_name --watch"
npm pkg set scripts.serve="vite preview --port 5001 --strictPort"
npm pkg set scripts.start="concurrently npm:watch npm:preview"
Install dependencies:
npm install --save-dev vite @vitejs/plugin-react
npm install --save-dev @originjs/vite-plugin-federation
npm install --save-dev concurrently
npm install --save-prod react react-dom
Vite Configuration
Create a new file vite.config.js at the root of the project for use with react and the plugin-federation:
// vite.config.js
import federation from '@originjs/vite-plugin-federation';
import react from '@vitejs/plugin-react';
import { defineConfig } from 'vite';
// https://vitejs.dev/config/
export default defineConfig({
  plugins: [
    react(),
    federation({
      name: 'remote_app',
      filename: 'remoteEntry.js',
      exposes: {
        './NavMenuItems': './src/NavMenuItems',
        './Routes': './src/Routes',
        './ItemTabs': './src/ItemTabs',
      },
      shared: {
        react: { generate: true, import: false },
        'react-dom': { generate: true, import: false },
      },
    }),
  ],
  build: {
    modulePreload: false,
    target: 'esnext',
    minify: false,
    cssCodeSplit: false,
  },
});
Create an placeholder file index.html at the root of the project:
<!-- index.html -->
<!-- This is not used -->
<html />
Entry-Points
Each of the entry-points must be defined in the vite.config.js so that they are exposed by the plugin. Edit the exposes key to set the appropriate values, with the key-name being the host entry-point and the value being the relative path to the file within the plugin project directory without the suffix (see here for more detail).
In this example, create a new folder src at the root of the project and add the files for each entry-point.
Routes
An array of objects containing path, children and exact keys which will be rendered as a react-router Route component (see docs for "path“, “children“ and “exact“).
// Routes.jsx
const Routes = [
  {
    path: '/helloworld',
    exact: true,
    children: <div>Hello World</div>,
  },
];
export default Routes;
This can be used to override the default MediaPortal routes with custom components as plugins are loaded at the start of the Switch component.
NavMenuItems
An array of objects containing path, title and icon keys which will be rendered into the left-side navigation component.
// NavMenuItems.jsx
const NavMenuItems = [
  {
    icon: <h2>👋</h2>,
    title: 'Hello World',
    path: '/helloworld',
  },
];
export default NavMenuItems;
Use the NavMenuItems entry-point to link to any of the plugin’s routes.
ItemTabs
An array of objects containing name, label and component keys which will be rendered on the item tab heading and loaded into the active tab when selected.
// ItemTabs.jsx
function HelloTabComponent({ itemId }) {
  return (
    <div>
      <h1>Hello</h1>
      <span>Here is a new tab for ${itemId}</span>
    </div>
  );
}
const ItemTabs = [
  {
    name: 'hello',
    label: 'Hello Tab',
    component: HelloTabComponent,
  },
];
export default ItemTabs;

The component will receive props for itemId and playerRef .
Scripts
Run the following commands during development and when you want to distribute your plugin.
watch
npm run watch - Rebuilds when modules have changed on disk. Use this during development.
preview
npm run preview - Starts a development web-server listing on port 5001 . Use this during development.
build
npm run build - Creates a production build in the dist folder. Use this for distribution.
Develop and Preview Plugin
Start both the watch script and preview script at the concurrently using the start script
npm run startCreate a new Plugin definition in ConfigPortal for local development. Set the Plugin Remote Entry to http://localhost:5001/my-mediaportal-plugin/remoteEntry.js, enable the entry-points, and set the plugin to be Active.
Refresh MediaPortal to load the new configuration and the plugin will be displayed. Any changes made to the plugin during development will require the page to be refreshed as hot-reload is currently not supported.
Publish Plugin
Building the plugin will output the files in the dist folder.
npm run buildUpload the folder containing the remoteEntry.js file to a web-server. This could be an Amazon S3 Bucket with Websites enabled (see here).
Alternatively, a container image with the plugin files and the nginx web-server can be used. An example Dockerfile will copy the dist directory
FROM nginx
COPY dist /usr/share/nginx/html
Build and start the container listening on port 8081
docker build -t my-mediaportal-plugin-nginx .
docker run --rm -d -p 8081:80 my-mediaportal-plugin-nginx
Shared Modules
The following shared modules are available from MediaPortal:
react: 18.2.0
react-dom: 18.2.0
react-router-dom: 5.3.4
@vidispine/vdt-api: 23.4.0-pre.4
@vidispine/vdt-js: 23.4.0-pre.4
@vidispine/vdt-react: 23.4.0-pre.4
@vidispine/vdt-materialui: 23.4.0-pre.4
@material-ui/core: 4.12.4
@material-ui/icons: 4.11.3
@material-ui/lab: 4.0.0-alpha.61
@material-ui/pickers: 3.3.10
@material-ui/styles: 4.11.5
axios: 0.21.4
Any additional shared modules should be added to vite.config.js .
Shared Module Example
Install the dependencies
npm install @vidispine/vdt-materialui@23.4.0-pre.4Create a new file TranscodeTab.jsx
// TranscodeTab.jsx
import { TranscodeDialog } from '@vidispine/vdt-materialui';
const tabs = [
    {
      value: 'TRANSCODER',
      label: 'Vidispine',
    },
];
function TranscodeTab({ itemId }) {
  return (
    <TranscodeDialog
      itemId={itemId}
      tabs={tabs}
    />
  );
}
export default TranscodeTab;
Import the new component into the ItemTabs.jsx entry-point.
// ItemTabs.jsx
import TranscodeTab from './TranscodeTab'
const ItemTabs = [
  {
    name: 'transcode',
    label: 'Transcode',
    component: TranscodeTab,
  },
];
export default ItemTabs;
Code Linting
Install development dependencies for eslint, prettier and the @vidispine configuration:
npm install --save-dev eslint@^8.0.0
npm install --save-dev @vidispine/eslint-config-react
npm install --save-dev prettier@^3.0.0
npm install --save-dev @vidispine/prettier-config
Edit package.json to enable prettier and eslint:
npm pkg set prettier="@vidispine/prettier-config"
npm pkg set eslintConfig='{"extends": ["@vidispine/eslint-config-react"]}' --json
Visual Studio Code
If you are using VSCode, create a folder named .vscode at the root of the project.
Create extensions.json within the .vscode folder to specify recommended extensions:
{
  "recommendations": ["esbenp.prettier-vscode", "dbaeumer.vscode-eslint"]
}
Create settings.json within the .vscode folder to enable the extensions on save:
{
  "editor.defaultFormatter": "esbenp.prettier-vscode",
  "editor.formatOnSave": true,
  "editor.formatOnPaste": true,
  "editor.rulers": [
    100
  ],
  "editor.codeActionsOnSave": {
    "source.fixAll.eslint": "explicit"
  },
}
Create tasks.json within the .vscode folder to specify the tasks which can be run:
{
  "version": "2.0.0",
  "problemMatcher": [],
  "tasks": [
    {
      "label": "build",
      "command": "npm",
      "args": [
        "run",
        "build"
      ],
    },
    {
      "label": "preview",
      "command": "npm",
      "args": [
        "run",
        "preview"
      ]
    },
    {
      "label": "watch",
      "command": "npm",
      "args": [
        "run",
        "watch"
      ]
    },
    {
      "label": "start",
      "dependsOn": [
        "watch",
        "preview"
      ]
    }
  ]
}
Use the command palette (MacOS: Command+Shift+P, Windows: Ctrl+Shift+P, Linux: Ctrl+Shift+P ) to run the start task to watch and serve at the same time.