
Workflow Description
The user should be informed about actions he has to perform manually, so that recordings can be performed without errors. For this purpose, the user should be informed in a reasonable time.
Motivation and Considerations
To solve recording problems that would prevent correct recording.
Actions are created in a defined time prior to the recording.
The user can mark the actions as solved.
If the action is not solved the system will re-create the action.
The action will be automatically solved if the user will do the change manually or by the system without manually solving it in the UI.
The creation interval for actions can be configured in the config UI.
There are two action types available:
-
Not assigned: Gives the user the hint to assign a source to a recording.
-
Collision virtual chunk: Gives the user the hint to fix a collision that has occurred due to a recurrence recording.
Actions will be shown as red triangle at the front of a recording on the timeline.
Step by Step
Phase 1
An action appears in the system:
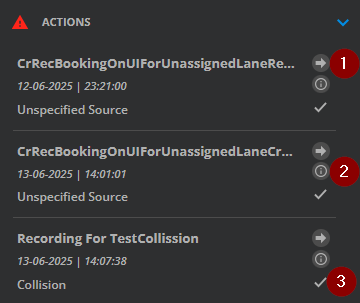
The user can
-
navigate to the occurrence on the timeline by clicking on the arrow button.
-
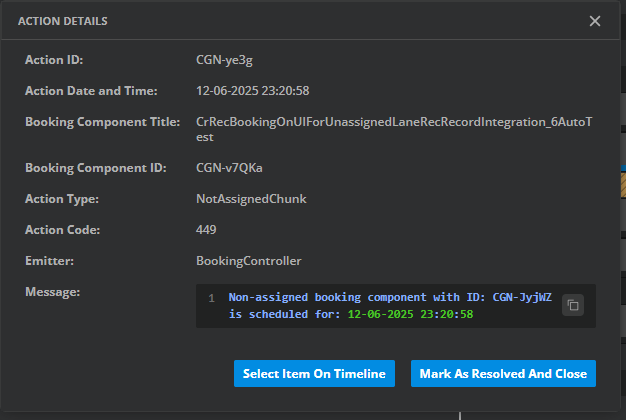
open details for the action by clicking on the information button.
-
resolve actions by clicking the checkmark button.
The Action Details dialog contains additional information about the action and offers the same operations (navigating and resolving):
Phase 2
The user can navigate to a specific element on the timeline by utilizing either the arrow button or the “Select Item On Timeline” button.
Once selected, the recording will appear on the timeline, and the cursor will move to the corresponding time.
Phase 3
In this phase, the user examines any collisions or missing sources and takes manual action to resolve these issues, either by addressing the collision or by adding the appropriate source.
After resolving the issue, the user marks the action as solved.
Alternatively, the system will automatically close the action during the next check interval.