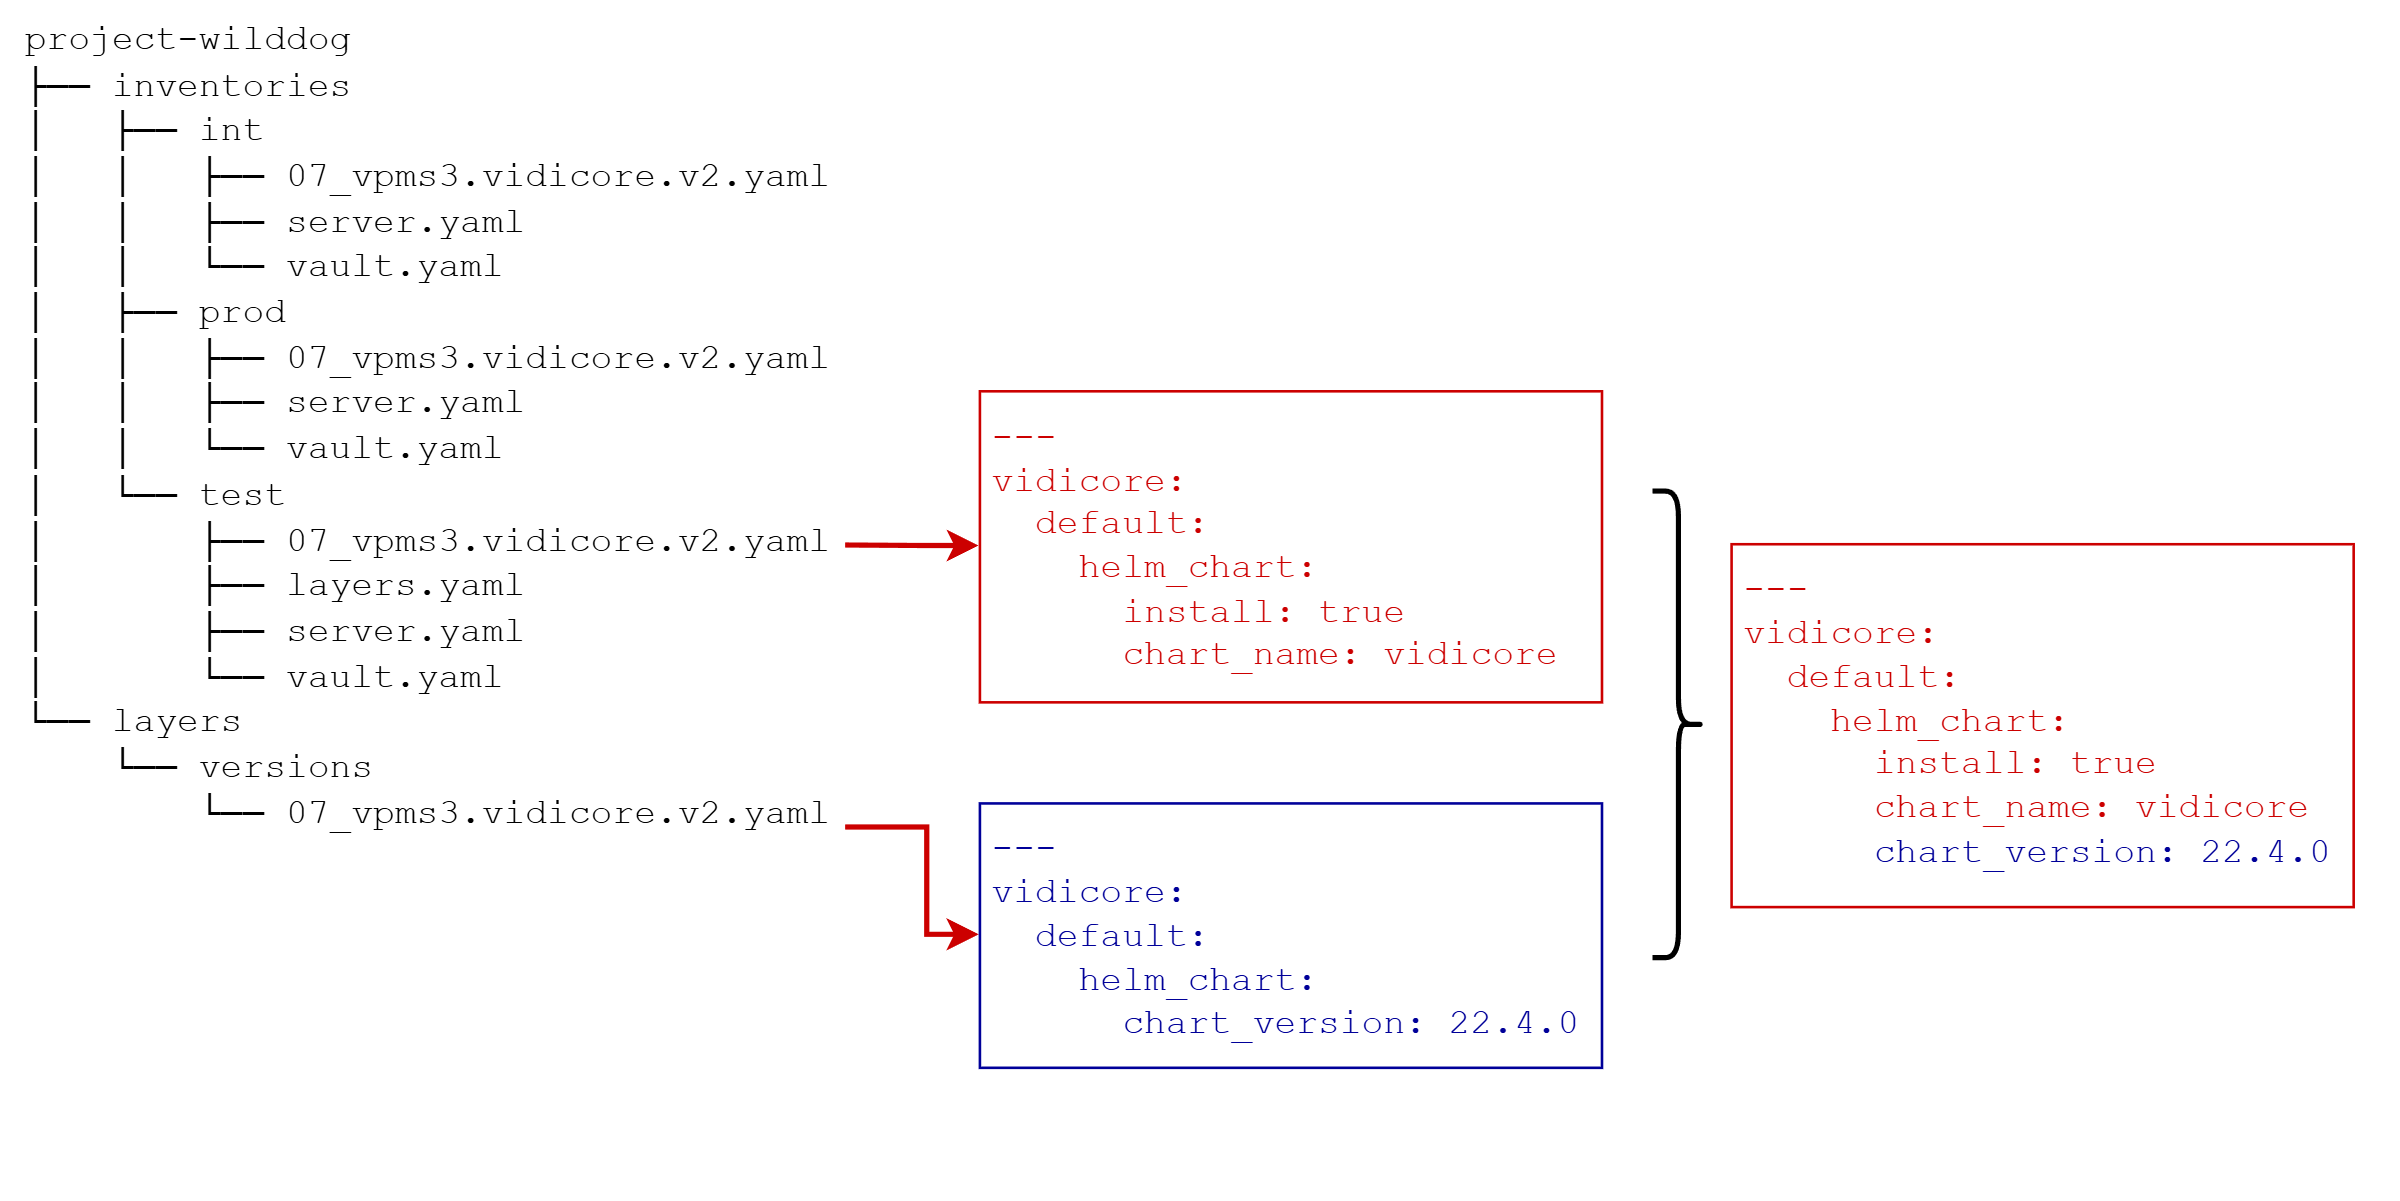
With the layered configuration it is possible to extract certain parts of the configuration and reuse this configuration in different environments. A good example for this is handling versions. Imagine you have a project wilddog with three different environments dev, int and prod.
For the sake of simplicity, we only have one component vidicore in this inventory. The layered inventory applies to all components you add in your inventory.
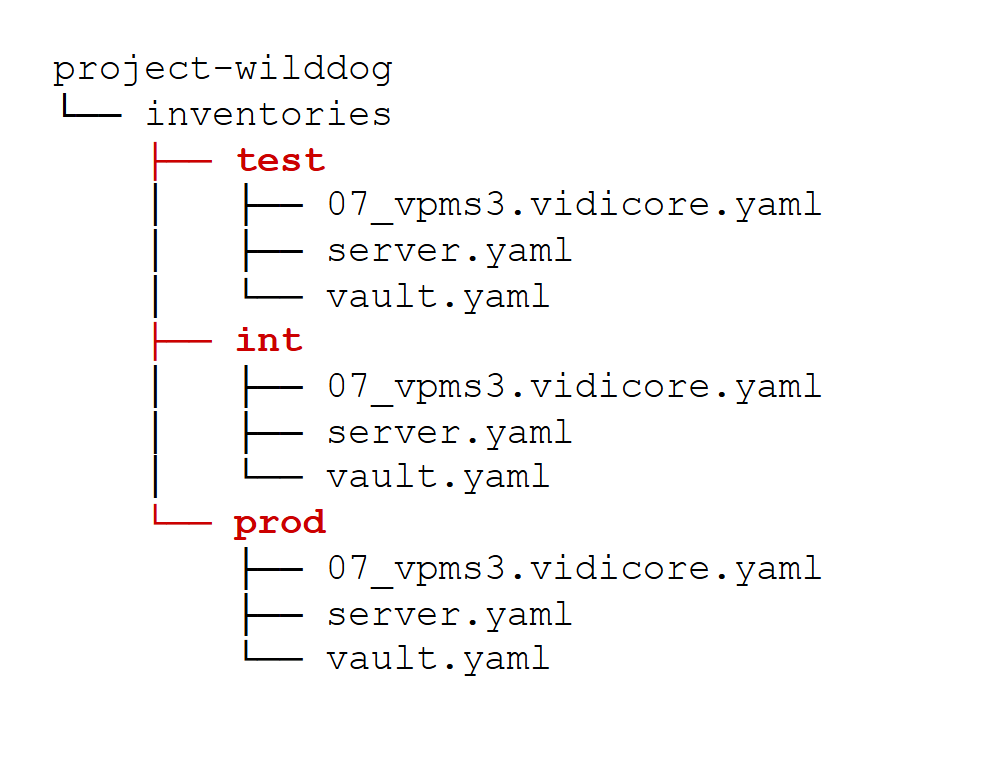
If you now want to specify the version, you need to edit each of the 07_vpms3.vidicore.yaml files and adjust the version in this file:
---
vidicore:
  default:
    helm_chart:
      chart_version: 22.4.0
Preparing a Layer
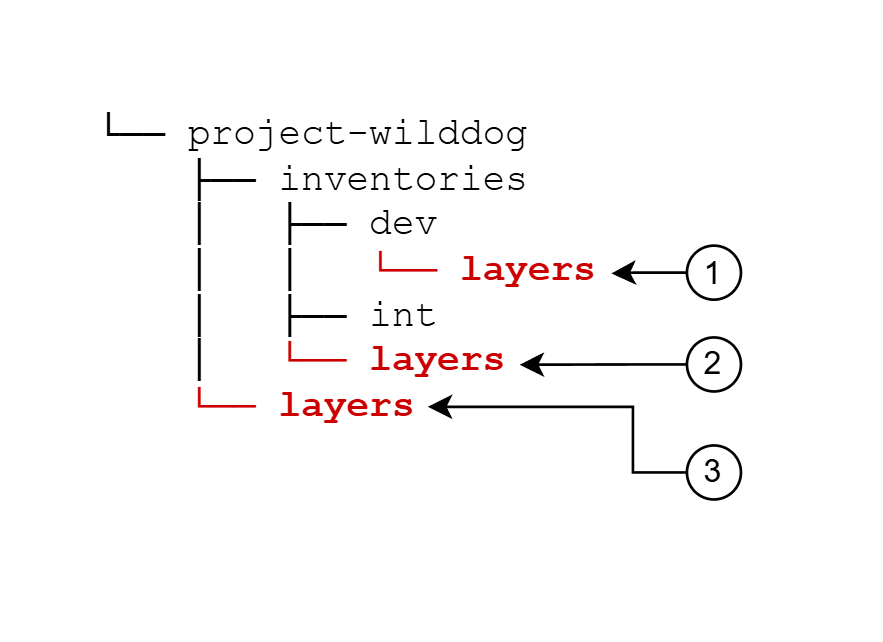
So if you want to keep the versions aligned across all your environments, you can utilize the layered feature of Prepared. To do so, extract the version into a separate file and reference this file in your environment specific directory. To begin, create the additional directories and the file 07_vpms3.vidicore.v2.yaml as shown:
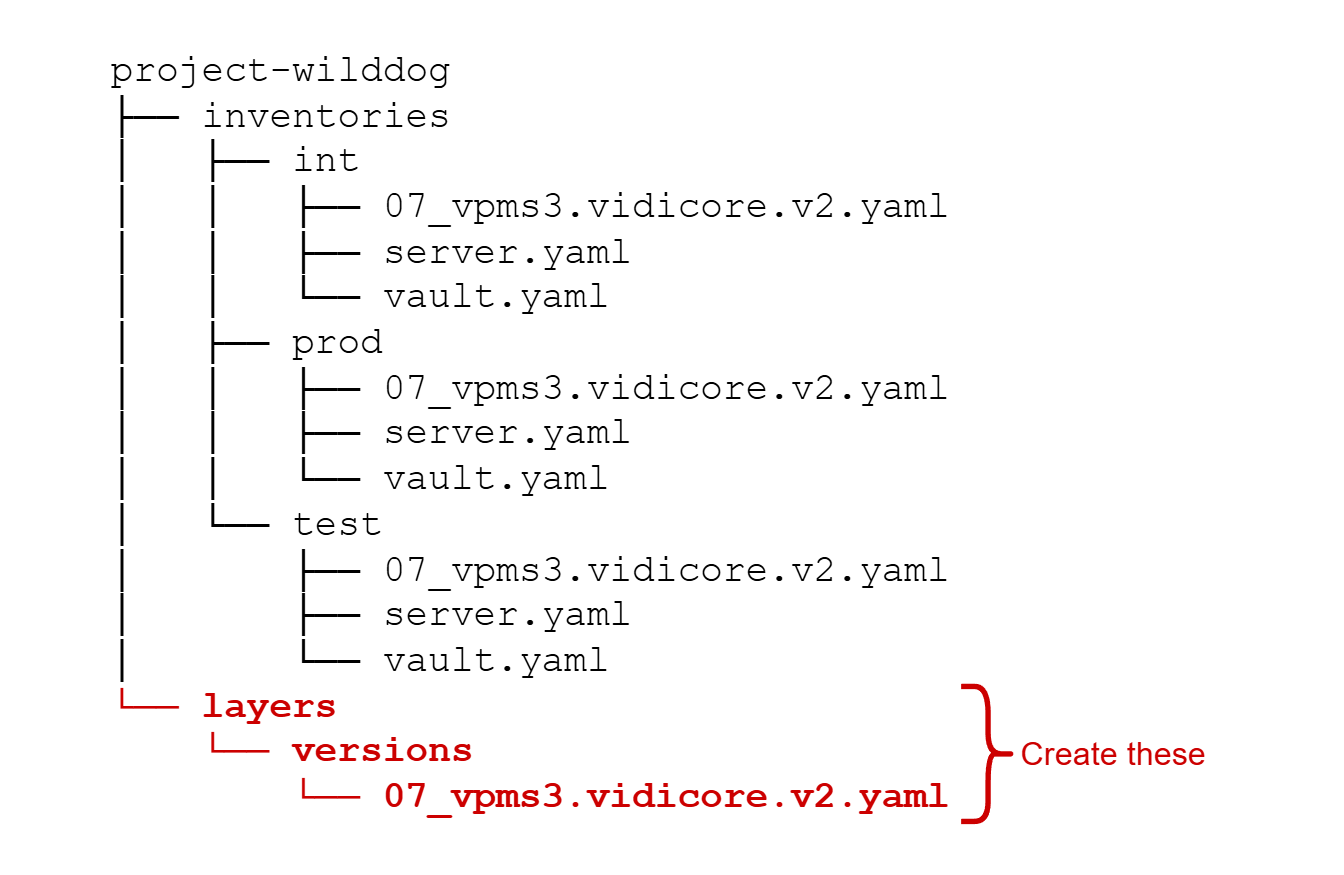
In the default, the layers directory need to be on the same level as the inventories. Edit the 07_vpms3.vidicore.v2.yaml and entere the version number you want to use:
---
vidicore:
  default:
    helm_chart:
      chart_version: 22.4.0
Referencing the New Layer
So far so good but we haven’t gained anything by adding the extra files. To use these files we have to create another file called layers.yaml within your environment with this content:
---
layers:
  versions: {}
As you can see in the following diagram, the entry versions references a directory within the created layers directory.
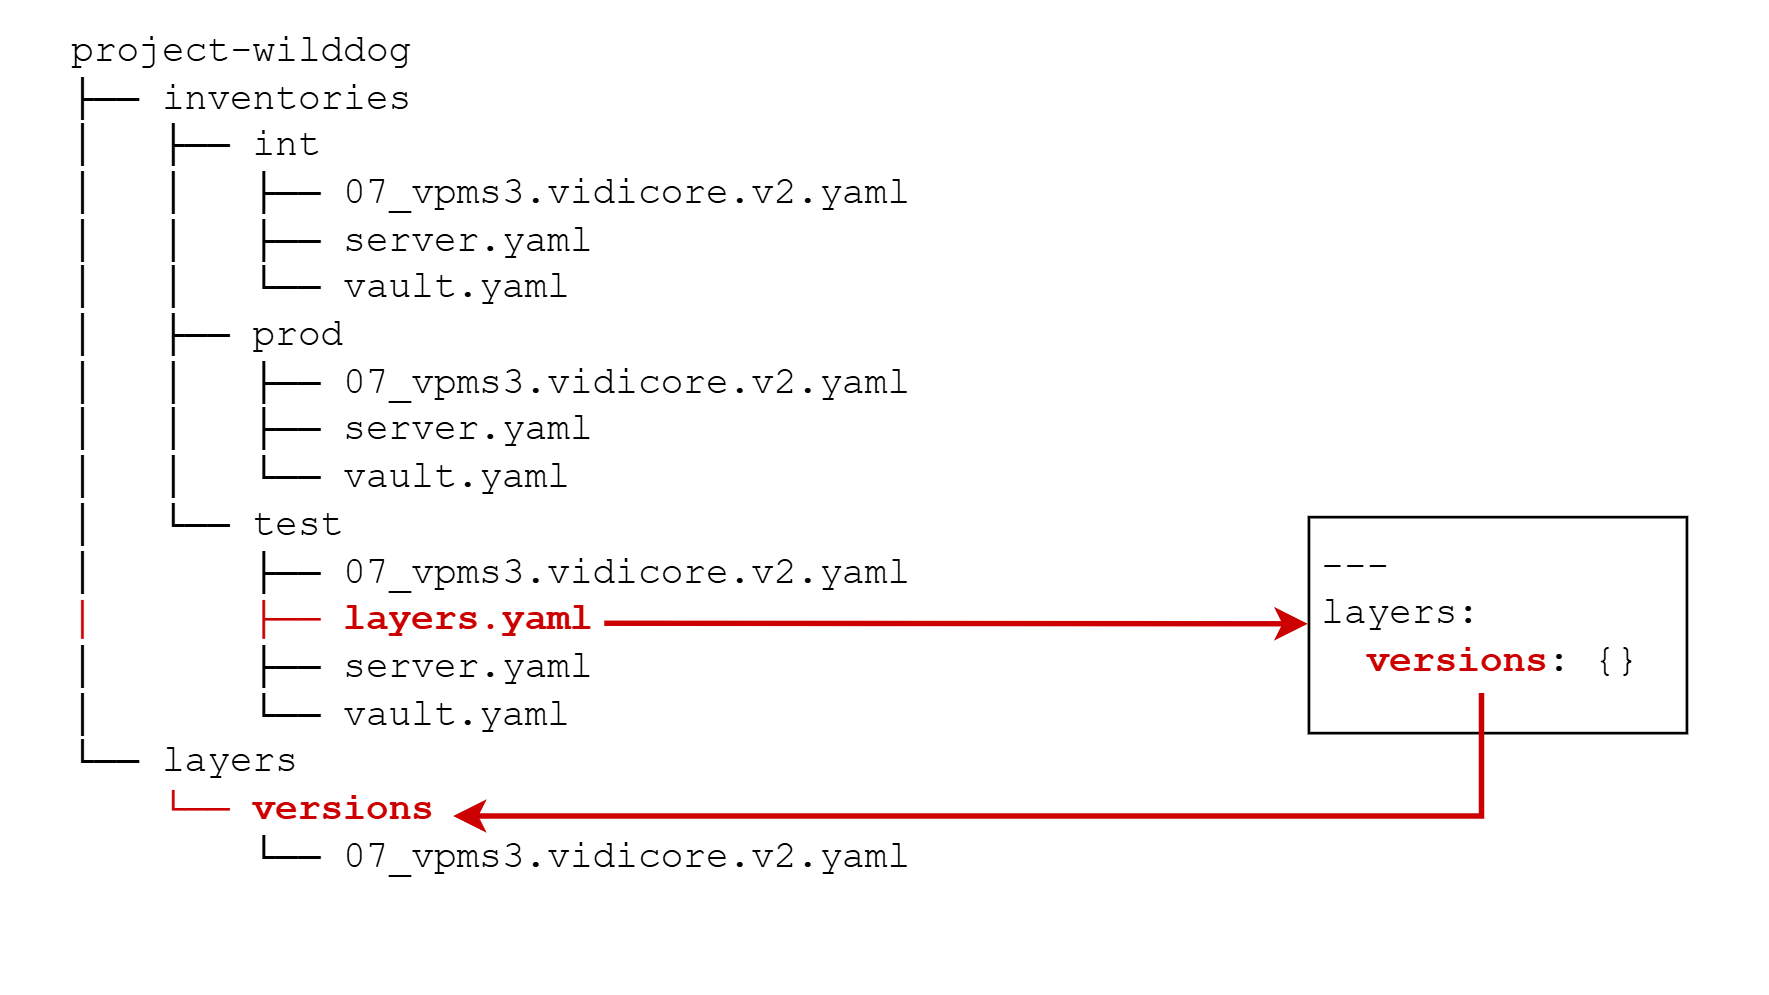
If you now run Prepared, it will load the layers.yaml from your inventory and merge files in the referenced directory having the same name as your component file. In our case the 07_vpms3.vidicore.v2.yaml will be merged.
The 07_vpms3.vidicore.v2.yaml in your inventory has always the highest priority. This means that if you have duplicate values in the layers file and your inventory file, the value in your inventory file will be picked.
Ordering of Layers
The layers in the layers folder have no specific order. They are just a bunch of directories containing configuration files. The include and ordering is solely achieved by defining a layers.yaml file in your environment folder.
Depending on the order within the layers.yaml file, the different layers will be included.
---
layers:
  versions: {}  # --> Order 1, will be included first
  resources: {} # --> Order 2, will be included after versions and override duplicate entries
In this case, files from the versions folder are included first and then files from the resources folder will be merged. Attributes defined in the latter will override those in the previous layer. After the layers, the inventory-file itself will be included
Stage Layers
Using the default, the loading of your configuration will be done like this:
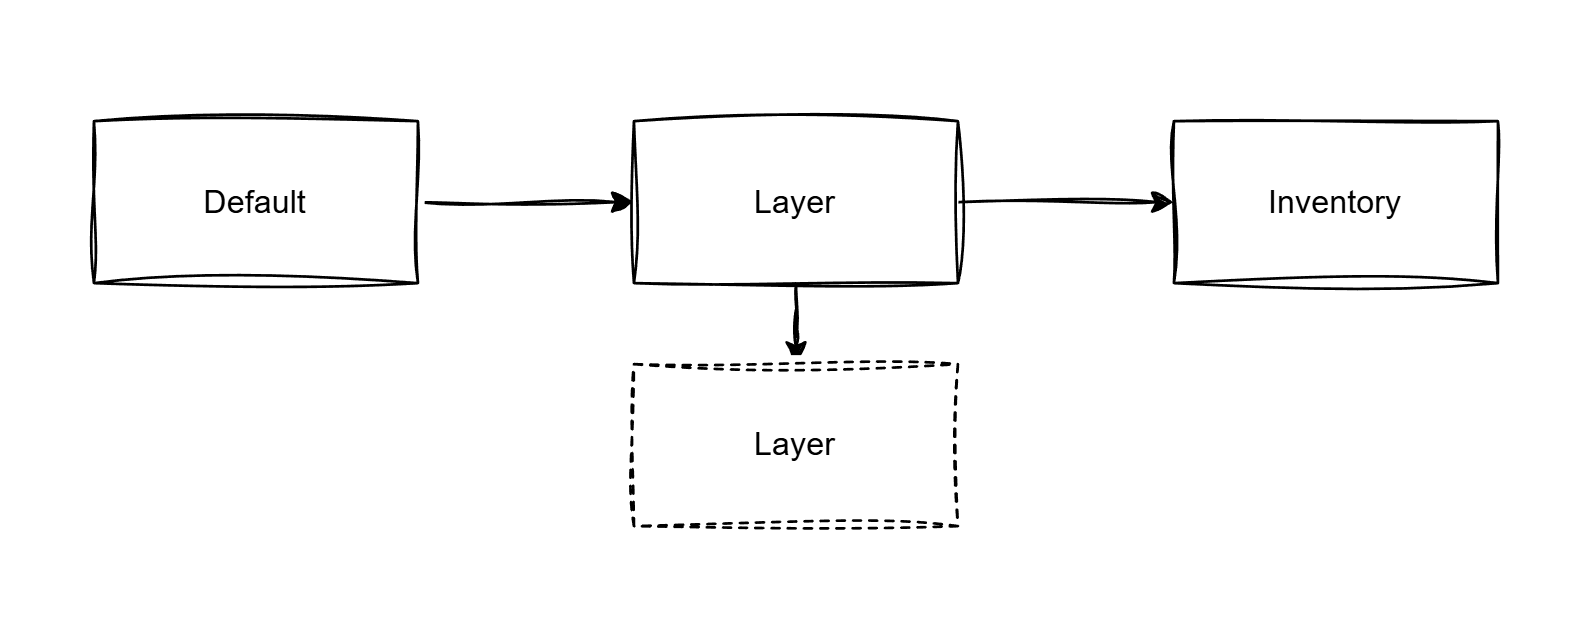
Your inventory-file has the highest priority, you can override any value from the default or one of the layers in your project inventory file.
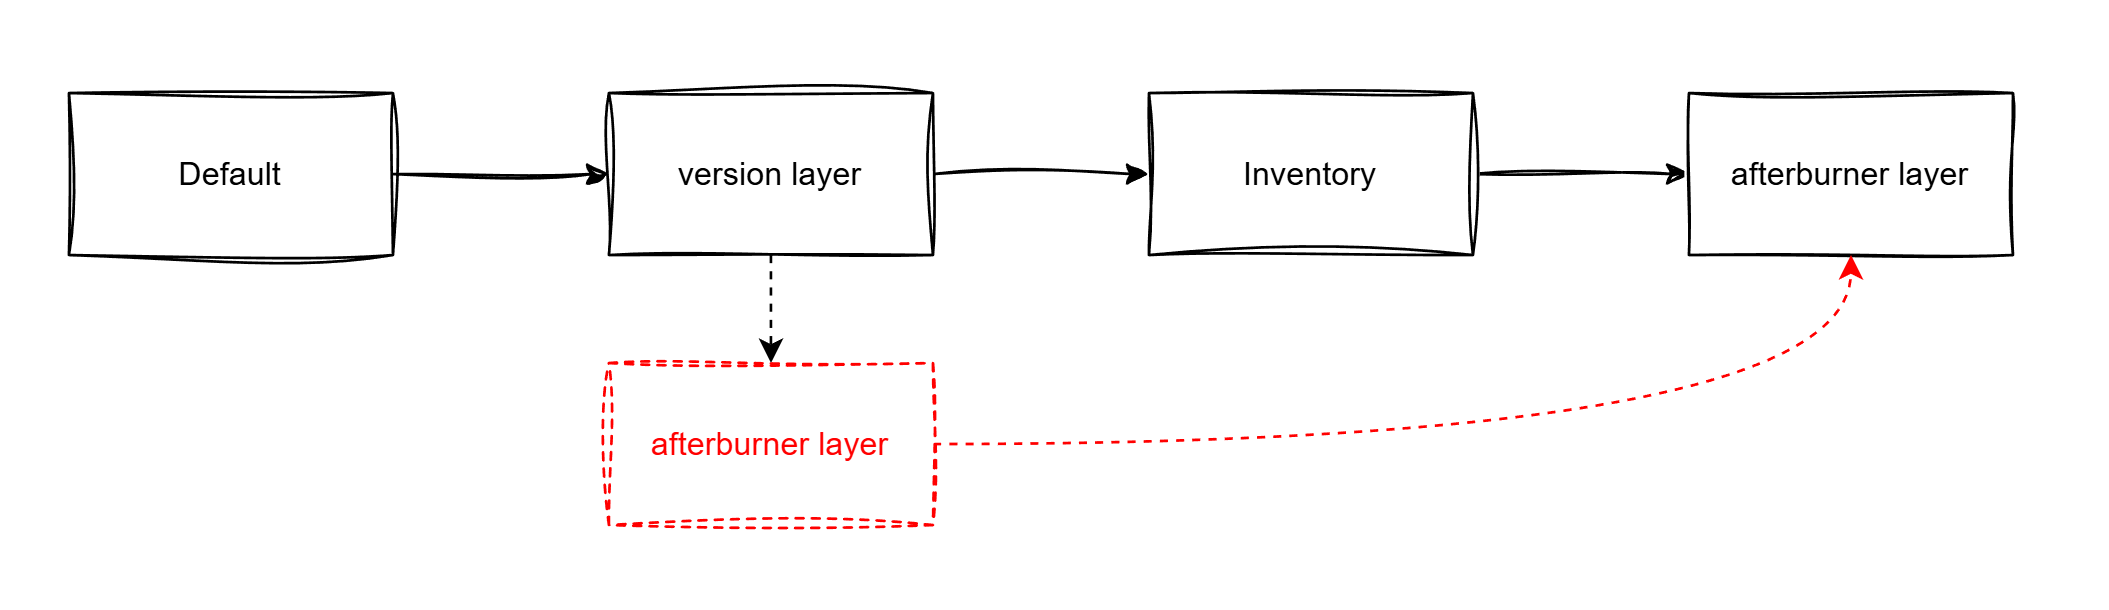
However, there may be the case that you need to apply a layer after merging your inventory file. For this case, you can define a post stage attribute in your layer
---
layers:
  versions: {}
  afterburner:
    stage: post
In this case the layer configured as post will be loaded after your inventory file.
Reference Layers within Layers
This has been added in Prepared 23.4 Make sure you use at least this version to be able to use this featue.
As seen it is easy to define the order of merging the individual layers referenced in the layers.yaml. However a layer must not always be “flat” and include all the individual inventory files only, it can also itself reference further layers via it`s own layers.yaml. When PREPARED has loaded a layer and finds a layers.yaml inside it it will first merge all the inventory files contained in the layer itself (if any exist) and then proceeds to merge any layers referenced in the layers layers.yaml. After these layers are merged (and maybe even more layers referenced inside the referenced layers layers.yaml) the next top level layer is processed. This results in a tree-like merging process.
The specification of how layers.yamls need to be structured and how they are evaluated is the same for each layers.yaml whether it is nested inside another layer or defined in the inventory level.
Essentially using layers.yamls in layers is equivalent to flattening the resulting tree structure of layers and then processing them in the flattened order.
Assume the above example of a versions layer which itself does not specify any versions itself but references individual layers containing product versions. The top level inventory layers.yaml could look like this again:
---
layers:
  versions:
    origin: oci://<user>:<pass>@vpms3.azurecr.io/prepared/layers/versions:23.3.0
and the structure of the versions layer could be this:
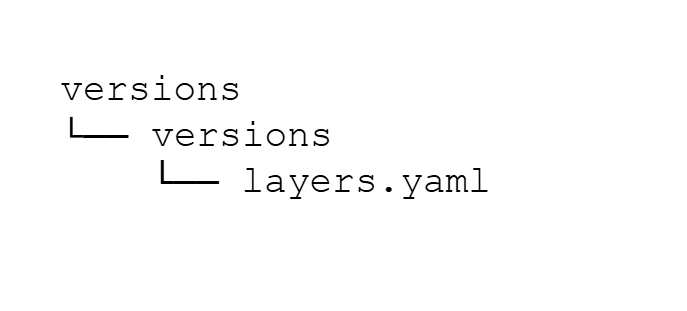
Now inside the versions layers.yaml are references to layers that specify per product versions such as:
---
layers:
  environment:
    origin: oci://<user>:<pass>@vpms3.azurecr.io/prepared/layers/versions/environment:23.3.4
  observability:
    origin: oci://<user>:<pass>@vpms3.azurecr.io/prepared/layers/versions/observability:23.3.0
  authservice:
    origin: oci://<user>:<pass>@vpms3.azurecr.io/prepared/layers/versions/authservice:23.3.10
  configportal:
    origin: oci://<user>:<pass>@vpms3.azurecr.io/prepared/layers/versions/configportal:23.3.0
  vidicore:
    origin: oci://<user>:<pass>@vpms3.azurecr.io/prepared/layers/versions/vidicore:23.3.1
  vidiflow:
    origin: oci://<user>:<pass>@vpms3.azurecr.io/prepared/layers/versions/vidiflow:23.3.0
When processing this input, this results in a tree like merging strategy as depicted here
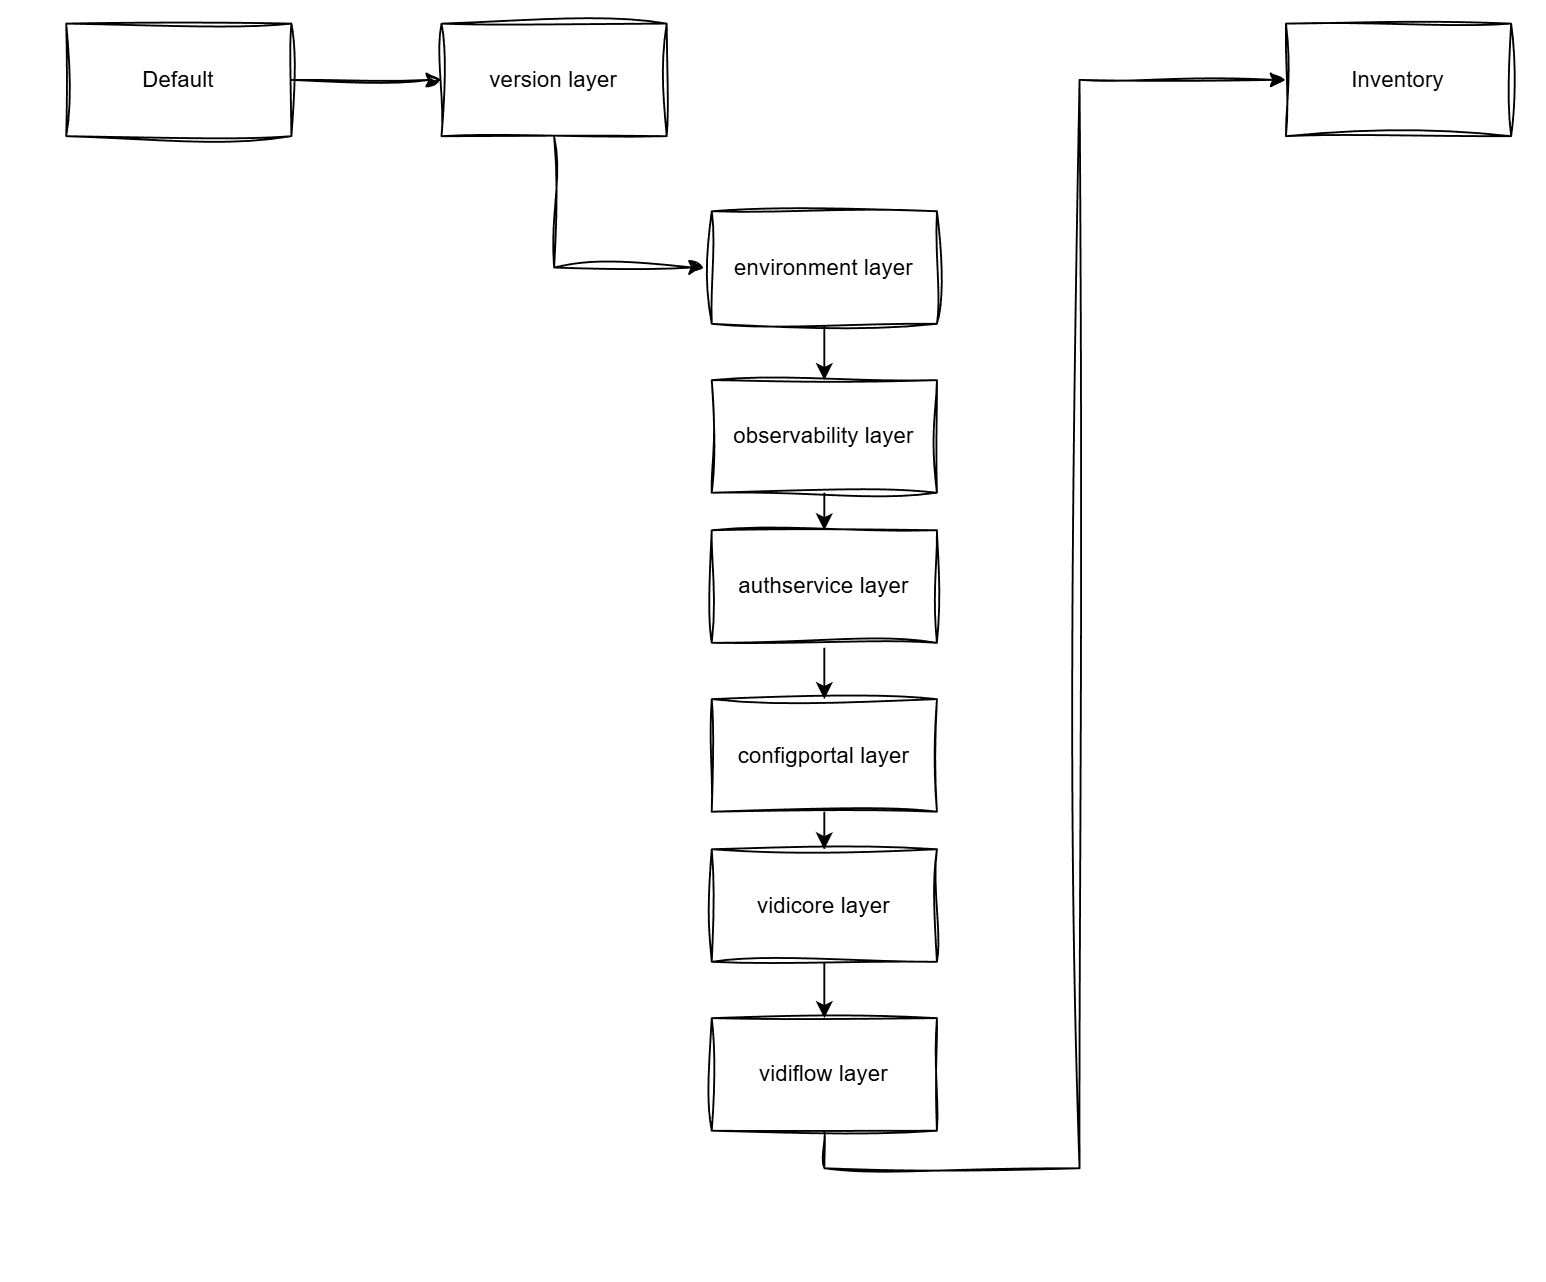
Using layers in layers is only really benefitial when the referenced artifacts are OCI layers!
This allows to build the OCI artifacts out of scope of the inventory (e.g. in Azure Pipelines) and use them to dynamically add information about the products that are maintained externally by the responsible party or product teams such as versions or resource settings.
Also check the setion on Rewriting on how to use the folder property to select a particular folder from the embedded layers
Configuring the Layers
This has been enhanced in Prepared 23.1.2. Make sure you use at least this version
Prepared will automatically configure the layers-directories. They will be searched in the following order:
-
layersfolder directly in your inventory -
layersfolder on the level of the environments -
layersfolder beneath the project folder
Any existing directory will be used to load the layered files in this given order.
Custom Path configuration
If you do not wish to use the default behaviour, you can configure different paths for the layers.
If you use custom path configuration, the automatic configuration will be completely disabled. Even if layer-directories exist, they will be ignored!
After you have setup everything for using the layers, you need to configure Prepared so it can use the layers. One thing you have to do is, that you exporse an environment variable PREPARED_INVENTORY_LAYER_DIRECTORIES which points to the root-directory where the layers are stored.
Enabling envvars
If you haven’t enable the envvars module so far in your configuration, do so by executing
sudo ./prepared.sh config enable-module envvars
We need to define an environment variable PREPARED_INVENTORY_LAYER_DIRECTORIES here, the value needs to be the root-directory of the layers. In our example
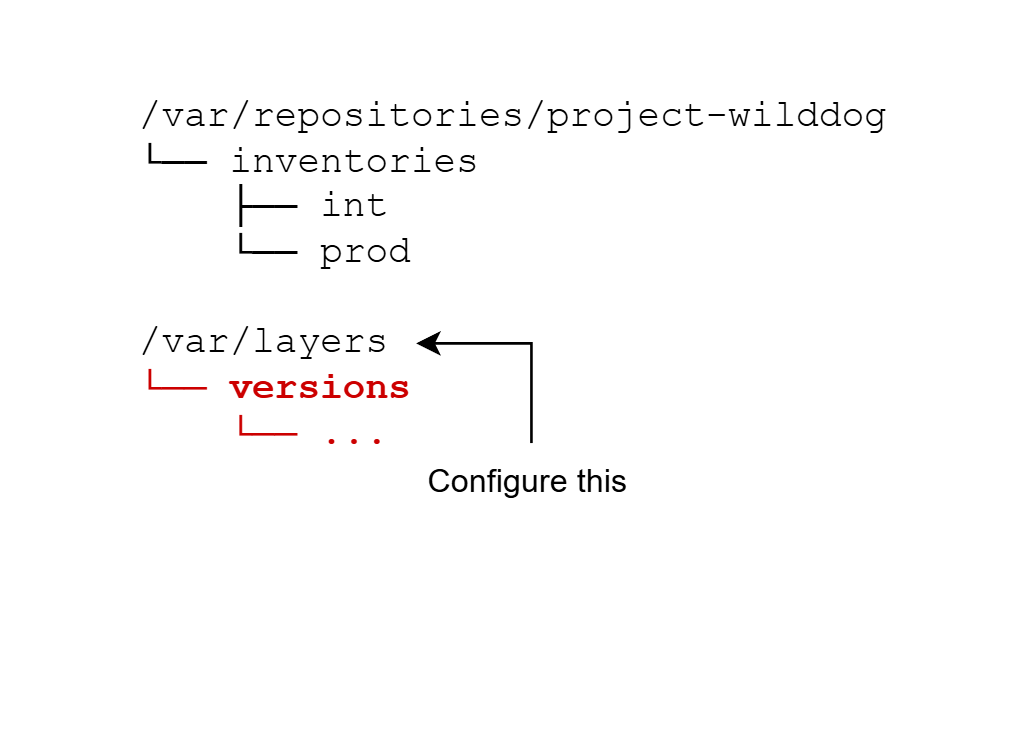
So, create a file <prepard-installer-dir>/<your-username>/envvars-layers.cfg and add the root-directory there. From our example this would be
PREPARED_INVENTORY_LAYER_DIRECTORIES=/var/layers
then you need to pass this file to prepared
sudo ./prepared.sh <command> [options] --envvars=<prepard-installer-dir>/<your-username>/envvars-layers.cfg
The name of the envvars file does not matter, you can choose whatever name you wish. Just make sure that you pass it using --envvars=<path> and remember to specify an absolute path, otherwise this will NOT work
Templating with layers
If you add layer(s) to your inventory, the overall output well be templated in this way:
Template values from Ansible/PREPARED => overwritten with layers in your inventory => overwritten with the values specified in your inventory
Using OCI Artifacts
One can use th origin attribute to reference OCI-artifacts which are the being downloaded and used. Optinal credentials can be specifie in the URL:
---
layers:
  versions:
    origin: oci://<user>:<pass>@vpms3.azurecr.io/prepared/layers/versions:23.3.0
NOTE: It is possible to use Jinja2-Templating and reference any variable contained in your configuration.
origin: oci://{{ vault.oci.username }}:{{ oci.vault.pass }}@vpms3. ...
Rewriting
When inspecting a layer structure, by default PREPARED will look for a folder whose name is equivalent to the key name used in the layers.yaml and process only this folders contents.
In case you have mutiple folders in your layer structure or your single folder name differs from the key name you can use two mechanisms to influence this mapping.
Regex matching
Using the below rewrite configuration you can utilize the power of regex to rename your foldername:
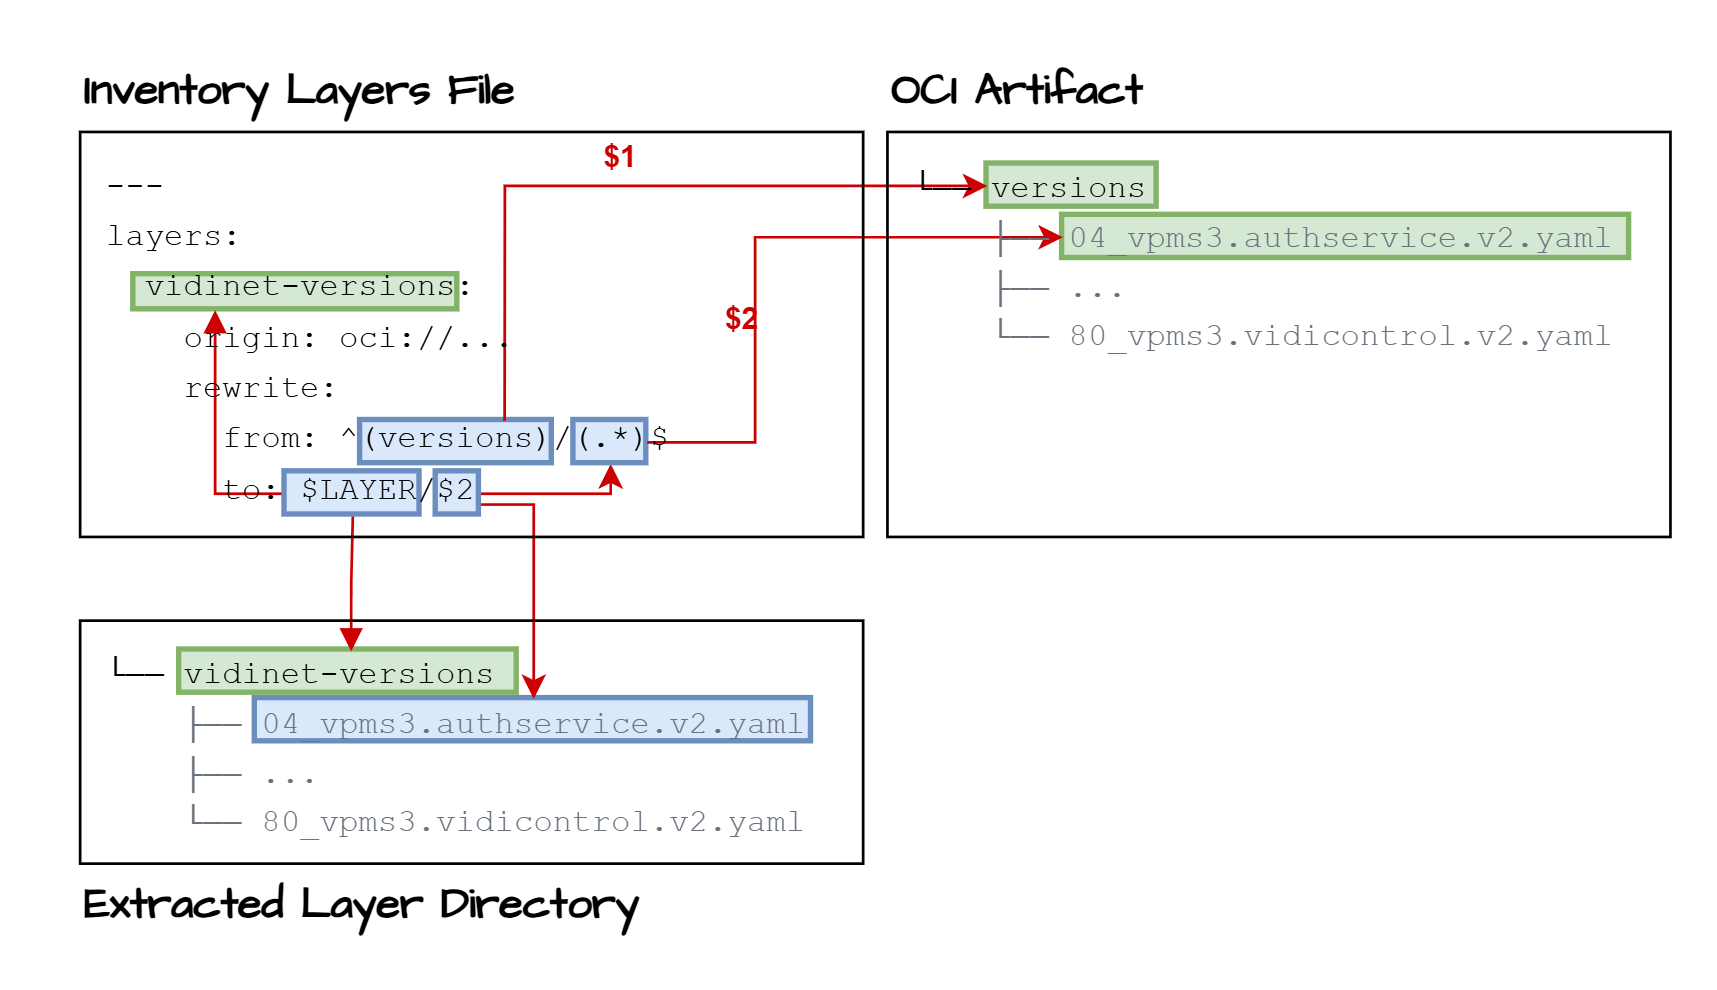
Using regex potentially allows more complex operations such as renaming files and not only replacing folder names.
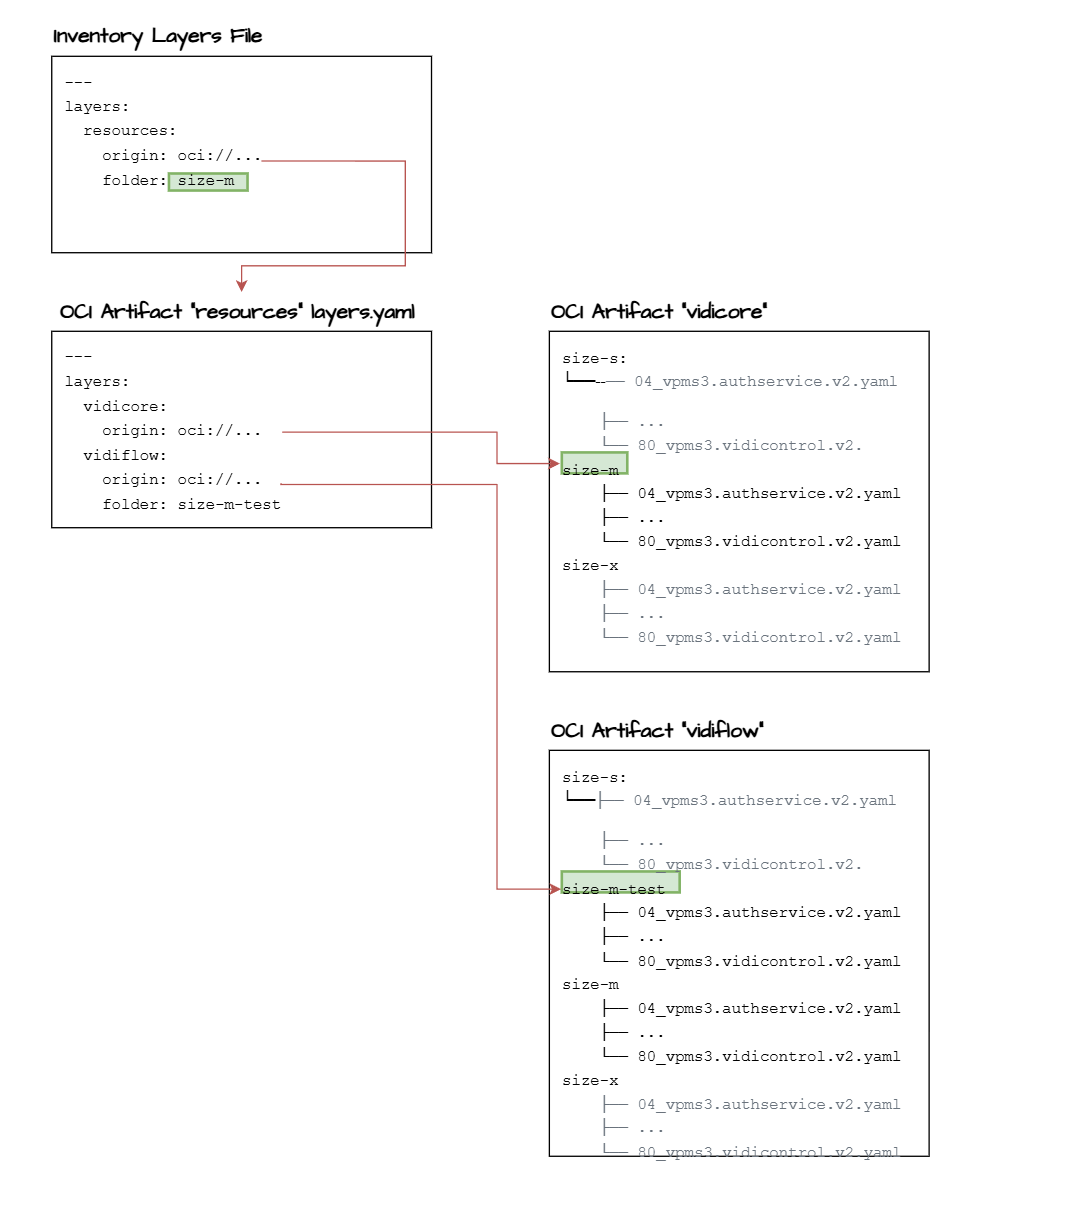
Folder selection
Using the folder property it is possible to directly specify the folder to load within all layers that are loaded via this entry in the layers file. This is useful to load a particular aspect from several nested layer files.
The folder mechanism passes the selected folder value to each included layer unless the value is overwritten at a lower level. If overwritten the overwritten value is applied to all layers referenced via this overwritten layer.
Using the folder property, below diagrams showcases how the folder value is passed on and how it may be overwritten before passing it on: